
Caching in Databricks Explained
How I Use Caching in Databricks to Increase Performance and Save Costs


When learning about Databricks optimization, you have probably seen many articles, videos and documentation pages talking about it.
What I was missing, is a series of articles / notebooks to gather all the information and show concrete examples of how the techniques work.
This is the first notebook of a series on Databricks optimization, and I will start with Disk Cache (formerly called Delta Cache) and Spark Cache.
You can find the notebook on my GitHub (https://github.com/eduardandreip/databricks_optimization)
0. Key Takeaways
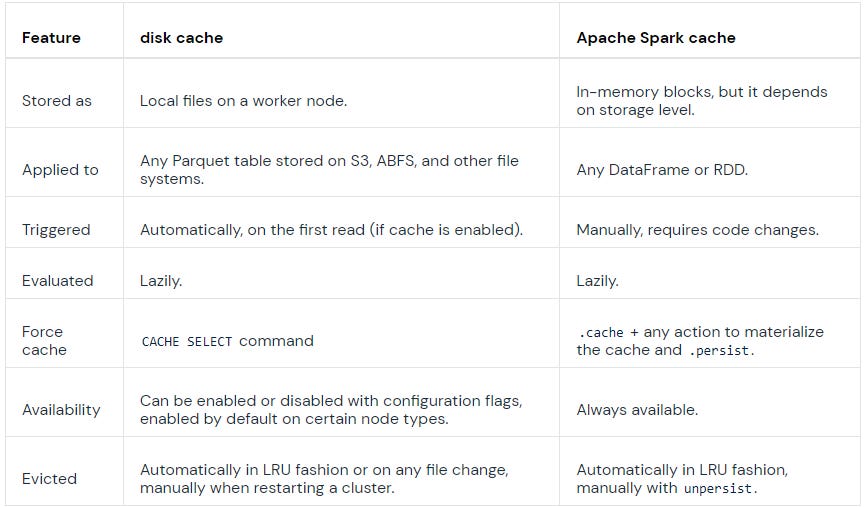
Disk Caching stores the underlying files, Spark Caching is concerned with storing Spark DataFrames or RDD’s.
Explicit caching gives us full control over the storage level and we can use the Spark UI to determine the effectiveness of caching.
Caching without proper analysis can decrease performance.
1. Introduction
Caching is a technique used in Apache Spark and Databricks to improve the performance of data processing operations. It involves storing the intermediate results of computations, so that subsequent computations can access the results faster without having to recompute them.
When discussing caching in Databricks, we must distinguish between two types: Disk Cache (previously known as Delta Cache) and Spark Cache.
For the definitions of Spark and Disk Caching and their differences, I will refer to the official documentation:
Disk Caching: Databricks uses disk caching to accelerate data reads by creating copies of remote Parquet data files in nodes’ local storage using a fast intermediate data format. The data is cached automatically whenever a file has to be fetched from a remote location. Successive reads of the same data are then performed locally, which results in significantly improved reading speed. The cache works for all Parquet data files (including Delta Lake tables). (https://docs.databricks.com/optimizations/disk-cache.html)
Spark Caching: Spark SQL can cache tables using an in-memory columnar format by calling spark.catalog.cacheTable(“tableName”) or dataFrame.cache(). Then Spark SQL will scan only required columns and will automatically tune compression to minimize memory usage and GC pressure. You can call spark.catalog.uncacheTable(“tableName”) or dataFrame.unpersist() to remove the table from memory. (https://spark.apache.org/docs/latest/sql-performance-tuning.html)
The main differences between them can be seen below:
2. Creating the Dataset
For my examples in this series I will be using the publicly available “Yellow Taxi Trip Records” and I will create a table based of it in my Databricks Workspace, add an Id column and transform the pickUpDateTime to a Date Integer:
%python
blob_account_name = "azureopendatastorage"
blob_container_name = "nyctlc"
blob_relative_path = "yellow"
blob_sas_token = "r"

wasbs_path = 'wasbs://%s@%s.blob.core.windows.net/%s' % (blob_container_name, blob_account_name, blob_relative_path)
spark.conf.set(
 'fs.azure.sas.%s.%s.blob.core.windows.net' % (blob_container_name, blob_account_name),
 blob_sas_token)

df = spark.read.parquet(wasbs_path)
df.createOrReplaceTempView('source')
%sql
CREATE SCHEMA optimization%sql
CREATE
OR REPLACE TABLE optimization.data USING DELTA AS
SELECT
sha1(
CONCAT(
vendorID,
tpepPickupDateTime,
tpepDropoffDateTime,
puLocationId,
doLocationId
)
) AS Id,
source.*,
CAST(
date_format(tpepPickupDateTime, 'yyyyMMdd') AS INT
) AS puDate
FROM
source
WHERE
1 = 1
AND puYear > 2016
AND puYear < 20193. Getting Into It
3.1 Explicit Disk Cache
Databricks provides us two options to use disk caching. Explicit and automatic. For explicit caching we have to specify the table or subset while the automatic caching is activated via configurations and files are added to the cache automatically on the first read. We will have a look at their behavior and differences. Let’s start with explicit caching.
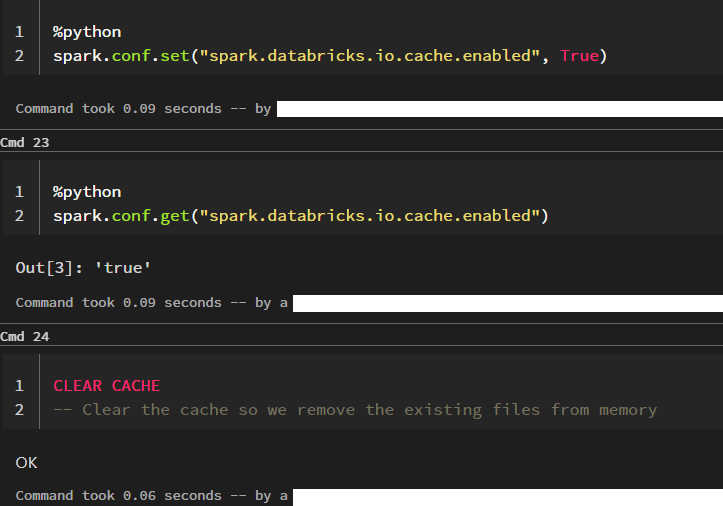
First, let’s have a look at the current cluster configuration:

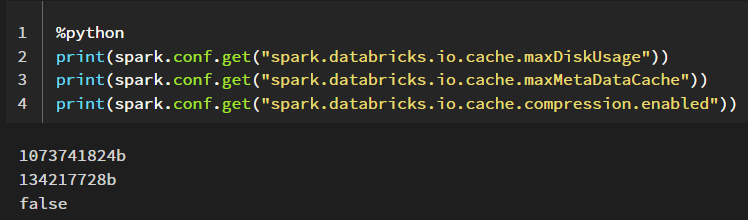
You can retrieve a specific spark configuration by using spark.conf.get() or all current configurations by using spark.sparkContext._conf.getAll()
I am currently using a General Purpose Standard_DS5_v2 cluster and as we can see, per default, the automatic disk cache for this cluster is disabled.
There are also Delta Cache accelerated clusters which per default have this and several other configurations enabled or specified and which affect how the disk cache uses the worker nodes’ local storage.
When using a cluster that is not Delta Cache accelerated, we can manually set these during the cluster creation, I will show how to do this further down below.
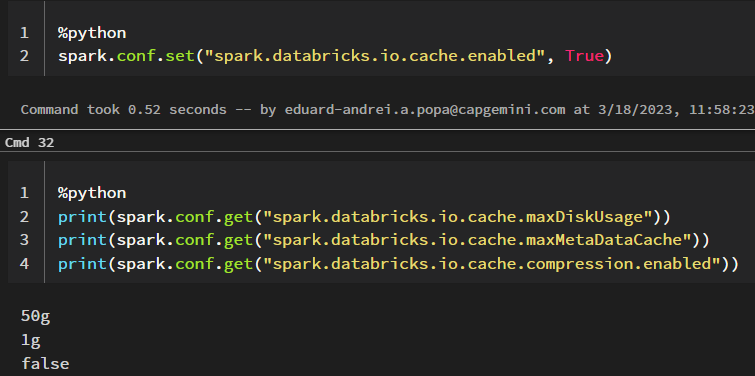
Example configuration:
spark.databricks.io.cache.maxDiskUsage 50g
spark.databricks.io.cache.maxMetaDataCache 1g
spark.databricks.io.cache.compression.enabled false
Source: https://docs.databricks.com/optimizations/disk-cache.html#manual-caching
First, I want to create a view, which we will use for our comparison. With this query, I just want to identify a specific subset of our data:
%sql
CREATE
OR REPLACE TEMPORARY VIEW ssdf_specific_trip_type AS (
  SELECT
    *
  FROM
    optimization.data
  WHERE
    1 = 1
    AND vendorID = 1
    AND passengerCount = 4
    AND tripDistance = 3.1
    AND doLocationId = 148
    AND fareAmount = 13
    AND extra = 0.5
)
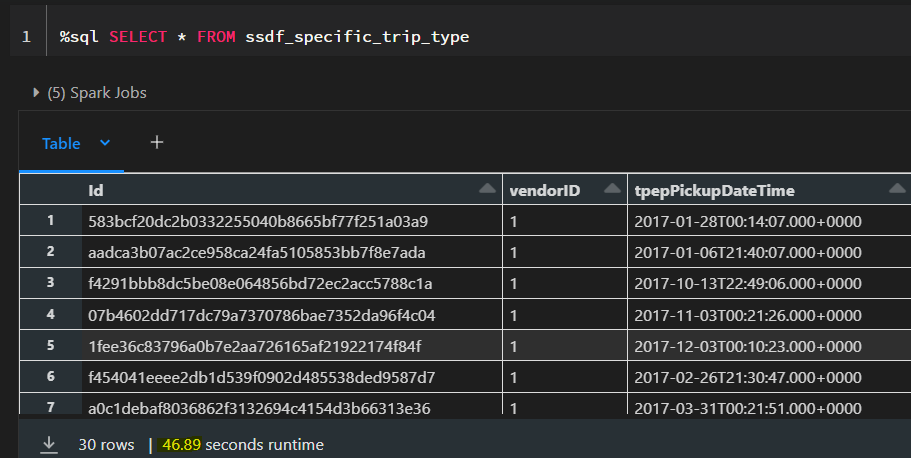
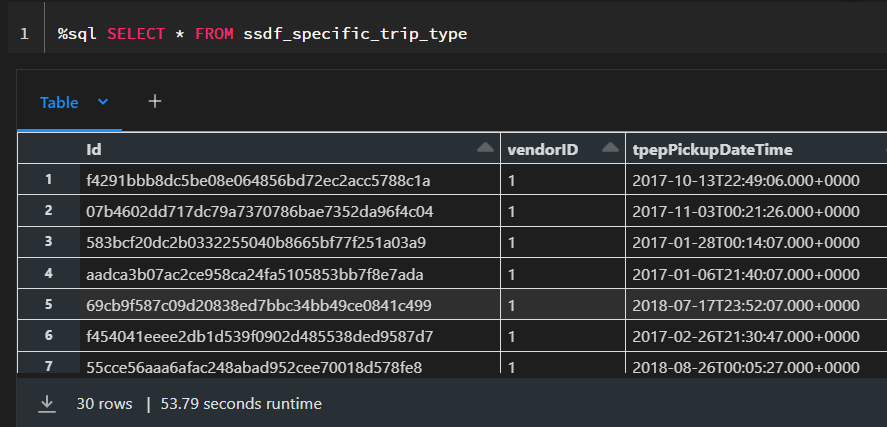
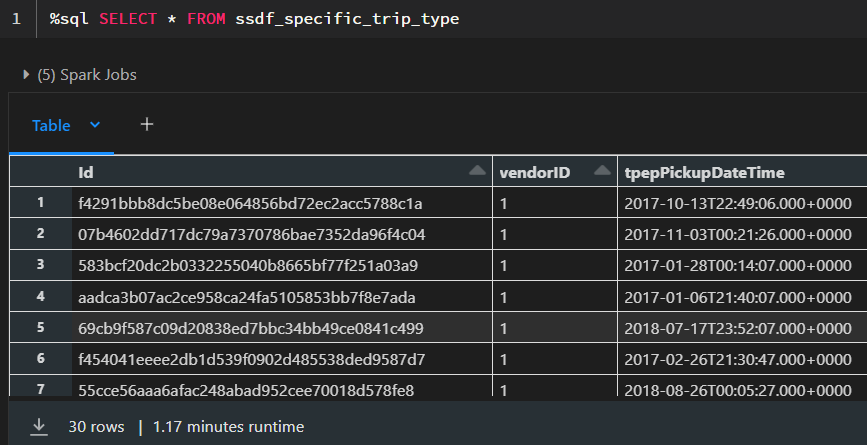
When we now select the records from this view, we can see that it takes around 50 seconds. We are now going to cache the table and see how long it takes to fetch the results afterwards.

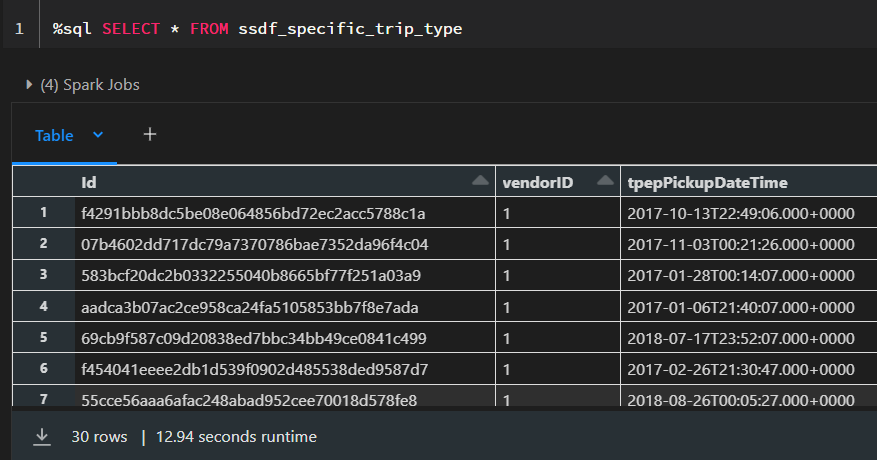
After the table is cached, it only takes 0.74 seconds to retrieve the results. However, caching itself already took 35 seconds and therefore it only make sense to cache the table if we intend to use it multiple times in our processing. Otherwise we would simply use up memory space that could be used better for other purposes.
We can also cache specific subsets of a table by using:
%sql
CACHE SELECT column_name[, column_name, ...] FROM [db_name.]table_name [ WHERE boolean_expression ]
But what actually happened in the background? Let’s take a closer look at the CACHE syntax and the Spark UI.
3.1.1 Syntax and Storage Level
The syntax for caching this way is the following:
CACHE [ LAZY ] TABLE table_name
  [ OPTIONS ( 'storageLevel' [ = ] value ) ] [ [ AS ] query ]
Per default, the caching using SQL is eager and the LAZY parameter enables to only cache the data the first time we use it.
When we perform the caching operation in this way, the default parameter for caching is MEMORY_AND_DISK.
Here are the different storage level parameters available for disk caching:
DISK_ONLY: This level stores cached data only on disk. This level provides the most durability, as the data is stored on disk and can be recovered in case of failures. However, the access to the cached data is slower than other levels.
DISK_ONLY_2: This level is similar to DISK_ONLY, but it replicates the data on two different disks, which provides extra durability. All the following configurations ending in 2 do the same thing.
MEMORY_ONLY: This level stores cached data only in memory. This level provides the fastest access to cached data, but the data is lost in case of failures.
MEMORY_ONLY_2
MEMORY_ONLY_SER: This level stores cached data only in memory, but the data is serialized using the Java Serialization API. This level reduces the memory footprint of the cached data but requires extra time for serialization and deserialization. All the following configurations ending in SER do the same thing.
MEMORY_ONLY_SER_2
MEMORY_AND_DISK: This level stores cached data in both memory and disk. Data that doesn’t fit in memory is spilled to disk, and when the cached data is accessed, it is first retrieved from memory, and if it is not there, it is loaded from disk. This level provides faster access than DISK_ONLY and more durability than MEMORY_ONLY.
MEMORY_AND_DISK_2
MEMORY_AND_DISK_SER
MEMORY_AND_DISK_SER_2
OFF_HEAP: This level stores cached data off the JVM (Java Virtual Machine) heap in native memory. This level provides more memory space for the cached data, but requires extra overhead for memory management and garbage collection.
3.1.2 Spark UI
If we now look at the storage tab in the Spark UI of our cluster, we can see that we have an RDD (Resilient Distributed Dataset) called “In-memory table ssdf_specific_trip_type” which is stored in memory. As the default storage level is MEMORY_AND_DISK, we can also see “Disk Memory Deserialized 1x Replicated” in the storage level.
We also see that we have 110 cached partitions and when we click on our RDD, we can see the different blocks stored on the executors. As we have not exceeded the available memory, the data is now stored only in memory, as visible in the storage level.

3.2 Automatic Disk Cache
We are now going to look at the caching behavior when the automatic disk cache is enabled. So, as in our case it is not, we have to set the configuration.
I am now going to run the select statement two times. We would expect that the second time to be much faster as the first one, as the data should be cached, right?

What happened here? Shouldn’t the second execution be much faster?
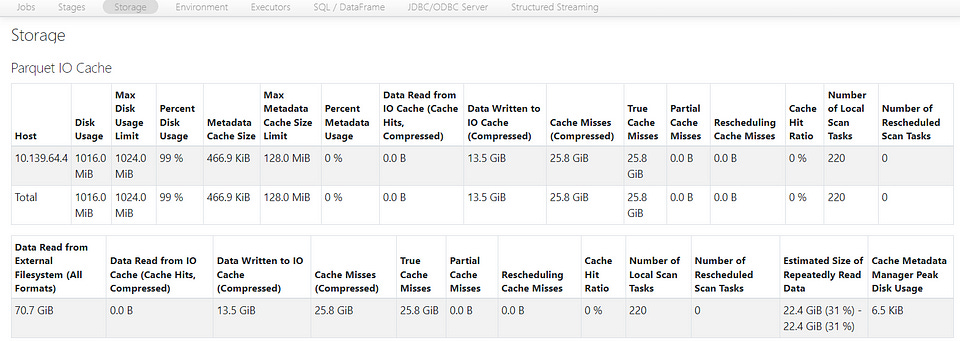
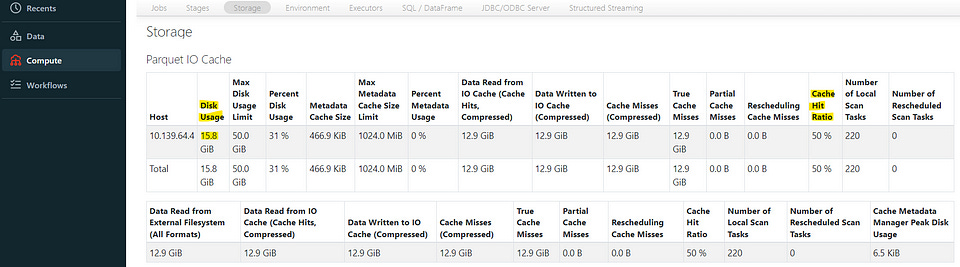
If we look at the Spark UI, we can see that we have a “Disk Usage” of 1016 MiB and a “Max Disk Usage Limit” equal to 1024 MiB (We can also get the values from the configurations down below).
The table from which we read, has 12.9 GB and is currently unpartitioned and distributed across 55 Parquet files.

This means that currently, the 30 rows of our data can be distributed across all the of these 55 files summing up to 12.9 GB and we would have to cache our entire table to get the result faster, but our limit is currently capped at 1024 MiB.
For now, I am going to leave the table in this state and not go into partitioning and look at how to get the behavior we expect via configurations.

As we can see, we also cannot set the configurations dynamically in a notebook as they are static configurations but have to specify them in the Advanced options of our cluster — as mentioned before, Delta Cache Accelerated clusters have these set per default.
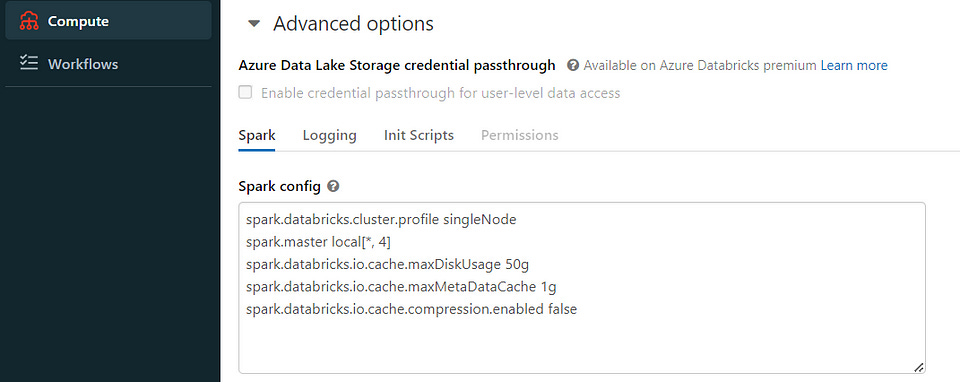
We now specify these as shown in the image and restart our cluster, recreate our temporary view and set the cache config.
Now we see the behavior we expect. In the Spark UI, the “Disk Usage” limit is now 50 GiB and we also see that we use 15.8 GiB (uncompressed compared to the compressed size of the table as Parquet files which is 12.9 GiB).
However, we can also see that it is slower i.e. data is stored only on disk and therefore explicitly caching gives us much more control over the storage level and the performance.
We can now also take this opportunity to have a look at the cache hit ratio:
In Spark, the cache hit ratio is a metric used to measure the effectiveness of caching. To be specific, the cache hit ratio measures the amount of time that a requested dataset or RDD is found in the cache rather than having to be recomputed.
The cache hit ratio is calculated by dividing the number of times a dataset or RDD is found in the cache (i.e., cache hits) by the total number of times it is accessed (i.e., cache hits plus cache misses). The resulting ratio is a percentage that indicates the proportion of cache hits to total access attempts.
A high cache hit ratio indicates that the cache is being used effectively and that a large portion of the requested data is being retrieved from the cache, which can significantly reduce computation time and improve query performance.
A low cache hit ratio, on the other hand, indicates that the cache is not being used effectively and that most of the requested data is being recomputed, which can result in slower query performance.
In our case, after the first time we run the query, we have a cache hit ratio of 0% but if we run it one more time it is already found in the cache the ratio goes up to 50%.
3.3 Apache Spark Cache
In contrast to Disk Caching which stores the underlying Parquet files, Spark Caching is concerned with storing Spark DataFrames or RDD’s.
We can cache a DataFrame by calling .cache() or .persist() and remove it from the cache by calling .unpersist().
The difference between .cache() and .persist() is that when when we call .cache() the storage level will be MEMORY_AND_DISK while when we call .persist() we have the option of specifying the storage level such as .persist(StorageLevel.MEMORY_ONLY) (after importing StorageLevel from pyspark.StorageLevel).
An important aspect of spark caching is that it is evaluated in a lazy fashion. Meaning the after we call .cache(), we need to call a spark action such as .take(), .show() or .count() in order for the caching to take place.
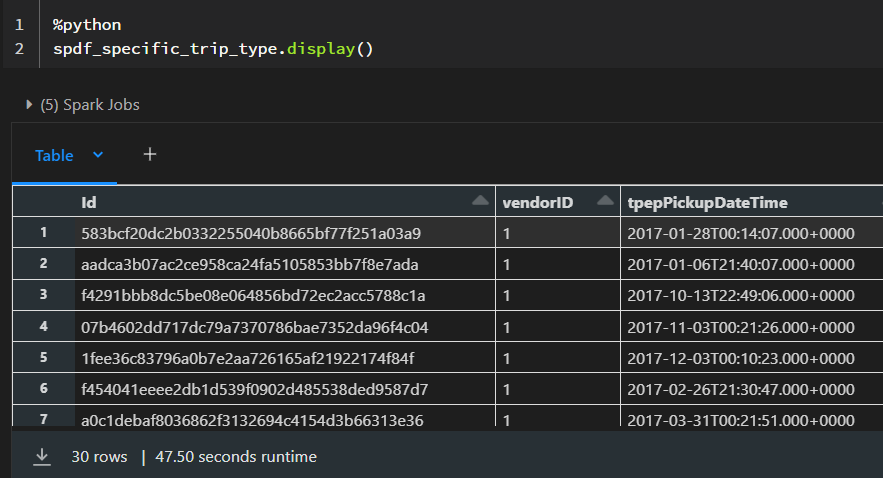
%python
spdf_specific_trip_type = spark.sql("""
SELECT
    *
  FROM
    optimization.data
  WHERE
    1 = 1
    AND vendorID = 1
    AND passengerCount = 4
    AND tripDistance = 3.1
    AND doLocationId = 148
    AND fareAmount = 13
    AND extra = 0.5
""")

This would be the easiest way to see the Spark Cache in action. However, there are several aspects we need to consider:
Here we are caching all the columns, but we might not need all of them for further processing and we should only specify those we need.
The analyzed and logical and query plans created by Spark need to match up to leverage the cache. I will not go into details but reference David Vrba’s article on “Best practices for caching in Spark SQL”. He recommends to always assign the cached DataFrame to a new variable to avoid any problems (cachedDF = df.cache()).
Filtering on parquet files is already fast and caching might actually slow down processing (Check out the “Faster than caching” chapter in David Vrba’s article) David goes into much more detail of the logical planning that takes place under the hood and other aspects we need to consider and I definitely recommend checking out his article.
Always remember to .unpersist() tables you do not need anymore to free up resources.
3.4 Combining Disk and Spark Cache
There is nothing stopping us from combining both caching methods. However, as pointed out in this article, one of the main issues with combining disk and Spark cache is the transfer times of raw DataFrames between the SSDs. This can result in decreased performance and slow down the processing pipelines. Therefore, it is important to carefully consider the size of the DataFrames and the available storage capacity before deciding to combine both caching methods.
Another factor to consider is the compression level of the data. Parquet files are already compressed in comparison to the DataFrames, which means that accessing them can be faster and more efficient than accessing the raw DataFrames. This is particularly true when dealing with large datasets where the size of the data can become a bottleneck in the processing pipeline.
To optimize the performance of the pipeline, it may be useful to cache the parquet files in the SSD and only load them into the Spark cache when required. This can help reduce the transfer times and improve the overall performance of the processing pipeline.
Thank you for reading!